My Blinkie
Wednesday, September 5, 2018
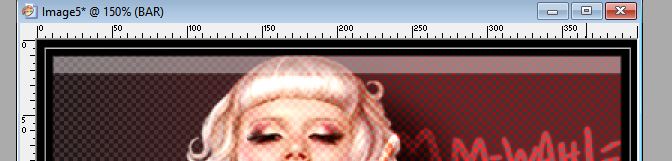
Jessica Dougherty - M-wah!

This tutorial was written by me September 4 2018 any resemblance to any other tutorial is completely coincidental.
SUPPLIES NEEDED:
I used Jasc PSP9, but any version will do
This was written for someone with the working knowledge of PSP
Animation Shop
Tube of choice. In this tutorial I used the gorgeous tube of Jessica Dougherty, you can find her and more of her art HERE
Filters Unlimited - Tronds Filters - Chessy
Font of choice
No Scraps
No Scraps
Brushes of choice
~~~~~~~~~~~~~~~~~~~~~~~
1. Open new canvas - 400 x 500 transparent.
2. Choose a color from your tube and flood fill the layer, rename this layer BG.
3. C/P your tube as a new layer, resize to fit, rename this layer TUBE.
4. Give your tube a large blurry drop shadow. I used EC 5 Impact, perspective shadow - see example below

5. New layer, selections, select all, selections, modify, select selection borders with these settings

6. Flood fill this selection with black. Select None. Rename this layer FRAME
7. Still on your FRAME layer. Grab your pen tool, line solid, size 10
8. In your color palette, foreground closed, background black. Draw a line horizontally across your canvas, see example below for placement

9. Highlight your BG layer and duplicate it. Move this layer up between your tube & frame layers.
10. Effects, FU2, Tronds Filters, Chessy, default settings.
11. In the layer palette, set the opacity to soft light, or one you that looks best to you. Rename this layer Chessy.
12. Highlight your top layer, which should be your FRAME layer.
13. New layer. Grab your preset shape tool, rectangle line 1. Foreground white, background closed - see example below
14. Go to View, click on "rulers".
I always use it, and I'm sure some of you do as well. Zoom in on your work a little. Place your curser in the top left corner of your canvas, see the little markings, move your curser over the first one on the top & the first one on the left, they will turn white. This mark equals 5pixels, which puts this frame in the middle of the black frame. Run this rectangle down to just below the horizontal line - see example below

15. Repeat this rectangle for the lower section of your black frame - see example below

16. Merge the two white frames together. Now duplicate the white frame, merge down and rename this layer white frame. I am duplicating the white frame to give it a little more definition.
17. Highlight your FRAME layer. Grab your magic wand, click inside the smaller lower section of your FRAME. Selections, modify, expand by 2. Add a new layer and rename it color. Move this color layer below the FRAME layer.
18. Choose another color from your tube. The end result of this color will be so different for every tube you use. Just find a color & setting you like. I ended up choosing a red from my tube and set the opacity to multiply. For the Anna Marine example below, I chose the color from her earrings and set the opacity to dodge.
19. Highlight your BG layer. New layer, name it brush.
20. Grab your brush tool and find a brush you like, or you can use an overlay or something decorative. Rename this layer brush. Play with the opacity or leave as is.
21. Add your copyright and tag info. I put mine on the bottom but I deleted the section of white frame from beneath the credits, see example below
22. If you don't wish to animate, then you can add your name, and save your tag as a jpg.
~~~~~~~~~~~~~~~~~~~~~~~
TO ANIMATE
If you are prepared to fiddle around and end up with up to 32 frames like this does, then you are welcome to continue. You can make the bar wider or narrower, that depends on your taste. Your upper frame may be longer or shorter than mine, if its shorter then you'll have less frames. My Anna Marine example only has 28 frames.
1. Grab your pen tool. Line solid, width 12. In your color palette, Foreground white, background closed
2. Hold down your shift key, and draw a straight line across your canvas, making sure that the line is the complete width of the canvas. When happy with it, convert to raster and rename BAR.
3. Move your BAR layer below your black FRAME layer. Lower the opacity to 40.
4. Now move your BAR layer up until it is flush with the black FRAME layer, see my example below
5. Zoom into your canvas so you can see better, you don't need to zoom in too much.
6. Duplicate your BAR layer and move the duplicate layer down until it sits flush with the original BAR layer. Continue doing this until you have the entire top section of black FRAME covered, see my example below

7. Close off all layers but leave the original BAR layer open.
8. Open AS. Copy merged and paste as a new animation frame.
9. Back in PSP. Close layer BAR, open your second frame, copy merged, in AS right click on your frame and paste after current layer.
10. Back in PSP... Close bar layer 2, open bar layer 3, copy merged, back over in AS, right click on your second frame, paste after current layer. Continue doing this with each layer from PSP to AS until you have all your Bar layers in AS.
11. Still in AS, click on your first frame. Edit, select all. Run your animation and if you are happy optimise and save as.
Thank you for playing with my tut... I hope you enjoy your result and remember, my tut is just a guide, use your imagination.
Here is a second example:

If you have any questions please email me - willowhoop@gmail.com

Subscribe to:
Post Comments
(Atom)
These old school tuts are awesome hun ♥
ReplyDelete