Welcome
I have 2 adult children, both
are happily married and doing
well. I share a home with my
Mother and pet rabbit Rex.
I've been playing with PSP
since 2001 and I'm still thoroughly
enjoying learning whilst I play.
The two main things I love to do is
tagging and tubing. I also enjoy
Photography, which I only took
up in 2016. Thank you for
visiting... please feel welcome
to ask any questions.
MY TOU
This is a 100% Copyright Compliant site.
~~~~~~~~~~~~~~~~~~~~~~~~~~~~~~
My tutorials are only a guide and I hope you use them to inspire your own creativity.
~~~~~~~~~~~~~~~~~~~~~~~~~~~~~~
All tutorials are written by me and any resemblance to any other tutorial is purely coincidental and unintentional. Please don't copy and paste them in any other website, blog, forum or social network site. Please don't try to claim them as your own. Any supplies included have either been created by me, or shared with permission.
~~~~~~~~~~~~~~~~~~~~~~~~~~~~~~
You are welcome to use them in Groups, please text link to my site or to the tutorial itself. You may not copy and paste them in your forum or group.
~~~~~~~~~~~~~~~~~~~~~~~~~~~~~~
I don't allow translation of my tuts for posting at other forums or websites. I've provided a translation tool to assist my non-English speaking visitors.
~~~~~~~~~~~~~~~~~~~~~~~~~~~~~~
If you have questions about any tutorial or you'd like to send me your results, please send an e-mail to willowhoop@gmail.com
~~~~~~~~~~~~~~~~~~~~~~~~~~~~~~
You may share links to my tutorials, my masks, templates, & word art on your forums, blogs, groups etc. Please do not share any of my work directly. Redirect to my blog for download.
~~~~~~~~~~~~~~~~~~~~~~~~~~~~~~
DO NOT ADD YOUR NAME TO MY Snags, Original Tags OR ERASE MY LICENSE NUMBER AND URL FROM MY TAGS.
THANK YOU
E-Mail Me
Thursday, August 2, 2018
ZlataM - COWBOY
This tutorial was written by me, August 2nd 2018, any resemblance to any other tutorial is completely coincidental.
SUPPLIES NEEDED:
I used Jasc PSP9, but any version will do.
Animation Shop
Tube of choice. In this tut I used a tube of nice eye-candy by ZlataM
I used the fabulous template from MysticMoonlit Designs made by Lori. Thank you for sharing with us Lori.
Font - https://www.dafont.com/vtc-nue-tattoo-script.font
Font - https://www.dafont.com/vtc-nue-tattoo-script.font
I have had this texture for a too long to remember where I got it from.
Right click and save as
Alien Skin EC 5 Impact Glass
Filters Unlimited 2 Unplugged Effects - Difference Noise
Penta.com - Jeans
Xero - Porcelain
Alien Skin Xenofex 2 - Constellation
Ready, set, go...
1. Open Lori's template, duplicate and close original. Delete the credits. Delete layer 4
Save your work
4. Highlight layer 3. Selections, select all, float defloat. Add a new layer and flood fill with the gradient. Change the blend mode of this layer to Overlay or one that you like best. Rename this layer "gradient".
5. Effects, Filters Unlimited 2 Unplugged Effects - Difference Noise at default settings.
6. Highlight layer 16. Selections, select all, float, defloat. Open "texture BDweathereddenim". C/P as a new layer. Selections invert, delete. Select none. Effects, Edge effects, enhance. Rename this layer "inner cog".
7. Highlight layer 18 and merge down with layer 13. Rename "cog".
8. Selections, select all, float, defloat. New layer. Flood fill both rings with a darker color from your tube or texture bg. I used #1c3249. Do not deselect.
9. Open the blue grunge texture, or one of choice. C/P as a new layer, selections, invert. Delete.
Now you can deselect. Change the blend mode of this layer to "overlay" or one you like.
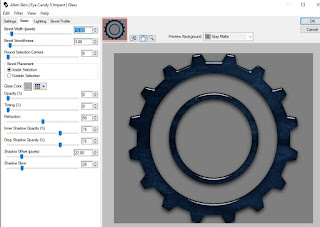
10. Merge this layer down once. Selections, select all, float, defloat. Alien Skin EC 5 Impact, Glass with these settings.
Save your work
11. Highlight layer 10. Selection, select all, float, defloat.
12. New layer. Flood fill with #00182d, or color of choice. Select none.
13. Effects, Filters Unlimited 2 Penta.com - Jeans with default settings. Rename this layer Jeans.
14. Highlight Penta.com layer, C/P your tube. Resize if needed.
15. Back on Penta.com layer, Selections, select all, float, invert. Highlight tube layer and hit delete. Rename this layer "tube". Deselect.
16. Effects, Xero Porcelain default settings.
17. Highlight BACK layer. Click r on your keyboard, click layer opaque and apply to crop your image back to 600x250.
18. Highlight tube layer and give him a drop shadow. I used V -2, H -8, Opacity 55, Blur 12.
Highlight layer 17.
19. Open texture "texture BDweathereddenim" again. On layer 17, Selection, select all, float, defloat. C/P texture as a new layer. Selections, invert. Hit delete. Select none.
20. Effects, edge effects - Enhance. Rename this layer 1.
21. Duplicate layer one 3 times, for a total of 4 layers. Rename each layer 1, 2, 3, 4. X out layers 2, 3, & 4.
Save your work
22. Highlight layer 1 and duplicate, add a drop shadow of choice to this layer, and rename constellation d/s.
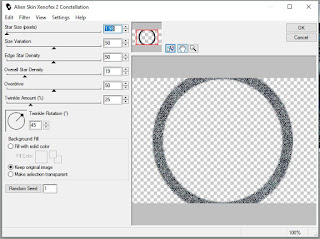
23. On layer 1 = Alien Skin 2 Xenofex - Constellation with these settings:
24. Close layer 1, open layer 2 = Alien Skin 2 Xenofex - Constellation - Random seed. Do the same to layers, 3 and 4.
25. Close out layers 2, 3, & 4 for now.
26. Highlight top layer. Add a new layer. Selections, select all, modify select selection borders with the following settings:
27. Flood fill with #00182d or color of choice. Rename this layer frame.
Add anything else you like, be it a word art or some elements, or just leave it as is.
Add your copyright and tagger info
Save your work
If you don't wish to animate, add your name and save as.
Lets Animate:
1. Making sure you have layer one open and layers 2, 3, & 4 closed. Highlight your top layer and copy merged.
2. Open AS. C/P as a new animation in AS.
3. In PSP, close layer one, open layer 2. Copy merged and paste "after current frame" in AS. Click on frame 2. Return to PSP, close layer 2, open layer 3. Copy merged and paste "after current frame" in AS. Click on frame 3. Return to PSP, close layer 3, open layer 4. Copy merged and paste "after current frame" in AS.
4. You should now have 4 frames in AS. Click on your first frame. Click Edit in the toolbar and click on select all.
5. You can test your animation by clicking on the "run animation" icon in the toolbar.
6. Click on File in the tool bar and choose Optimize Wizard, OK all through that and save your tag.
For new PSP'ers or anyone wishing to refresh their AS skills here is a good link on how to;
Thank you for trying my tut. Any questions please email me willowhoop@gmail.com
I'd also love to see how you choose to do this tut, feel welcome to send me a tag!!
Here is a second example:
Labels:Forum
Subscribe to:
Post Comments
(Atom)


0 comments:
Post a Comment