My Blinkie
Thursday, August 16, 2018
100% WOMAN

This tutorial was written by me March 4th 2018 any resemblance to any other tutorial is completely coincidental.
SUPPLIES NEEDED:
I used Jasc PSP9, but any version will do
This was written for someone with the working knowledge of PSP
Animation Shop
Tube of choice. In this tutorial I used the gorgeous tube 49-3 "Blue Dream6" by Lorenzo Sperlonga. You can find this tube at CDO HERE
Font of choice
No Scraps
Mura Meister Copies
Filters Unlimited 2 - VM Stylize - screenOrama
No Scraps
Mura Meister Copies
Filters Unlimited 2 - VM Stylize - screenOrama
You will find the frame and Word Art in my supplies HERE
~~~~~~~~~~~~~~~~~~~~~~~
1. Open new canvas - 345h x 265w. Add a new layer & flood fill with white.
2. Grab your preset shape tool, ellipse, create as vector, line width set at 2.
foreground black, background nil
3. Hold down the shift key whilst pulling out a circle that fits almost side to side of your canvas.
4. Objects - Align - center of canvas. DO NOT CONVERT TO RASTER.

5. Duplicate this vector layer. Close off duplicate for now.
6. Highlight original vector layer, convert to raster layer.
7. Again, duplicate this circle. On duplicate layer resize by 95%.
8. Merge down and rename this layer circle.
9. Grab magic wand, tolerance zero, feather zero. Select inside inner circle. Selections, modify, expand by 1.
10. Add a new raster layer and name it Circle Fill. Flood fill this layer with colour of choice. I used Black. Drop this layer below circle layer. Select None.
11. Unhide duplicate vector layer. Resize by 62%.
12. Grab your text tool. Font - Impact - size 34. Size will depend on the text or name you are going to use so play around until you are happy. Background = colour of choice, foreground Nil
13. Type out text or name, once happy with it, click apply. Go to layer palette and click on the 'x' to the right side of the vector layer click on the eye to close off the elipse layer.
14. Convert this layer to raster and rename it NAME.
This is what I have:

Save this layer as psp or psd, and minimize it for now.
~~~~~~~~~~~~~~
Open wh_frame, duplicate and close out original.
1. Close layer "Center Strip" by clicking on the eye, we will re-open it later.
3. Highlight white layer (bottom layer), copy & paste tube as a new layer.
4. Mura Meister copies - Wallpaper Rotate, make sure canvas is covered. If not, you can duplicate the layer, mirror and merge down. Rename this layer BG (background)
5.Adjust, Blur, Gaussian Blur = 10
6. Effects - Art Media Effects - Brush Strokes. Use setting below:

7. Highlight frame layer, grab magic wand, select inside frame and expand by 3.
8. Selections - invert. Highlight BG layer and hit delete. Deselect.
9. Duplicate BG layer
10. Effects - Filters Unlimited 2 - VM Stylize - Screen-O-Rama change the frequency to 155 and the angle to 150. Apply.
11. Highlight the frame layer again. Using magic wand select inside frame and expand by 3. Invert. Highlight copy of BG and hit delete, deselect.
12. Set this layer to Luminance (L) and lower the opacity to around 60. Or whatever suits best. Just play around until you find something you like.
13. Highlight frame layer and open Stip layer. Merge strip layer down with frame.
14. Copy & Paste tube as a new layer, resize to fit. Rename layer TUBE. Move tube to the left, so its sits inside left area of frame, see my example:

15. When happy with tube position, grab your magic wand, highlight frame layer, and select inside left portion of frame, selections, modify, expand by 3.
16. Selections invert and delete on tube layer if necessary. Move your tube below the frame. DO NOT deselect.
17. Selections, Invert, highlight Screen-O-Rama layer and hit delete. Select none.
18. Highlight tube layer, add drop shadow of choice. I used EC5 perspective shadow blurry and moved it up a little. Delete any drop shadow that falls outside of the frame.
19. Open SN-100-percent-woman-wordart, or wordart of choice. Copy & paste as new layer. Move this layer to the top and rename WA. Move into position. See my tag above for position.
20. Resize WA by 55%. EC5 gradient glow setting: AlienSkin EC 5 Impact using these settings: subtle white glow

21. I set my WA to Luminance (L). Add drop shadow to frame. I used v/h 2, 50, 5 black.
22. Resize tag to 500 pixels, if you like. Always resize your tag BEFORE adding copyright AND prior to animation. Add copyright and tagger info.
Save your tag, and set aside.
If you don't wish to animate, add your name, font of choice and save as png or jpg.
To Animate:
In PSP still...
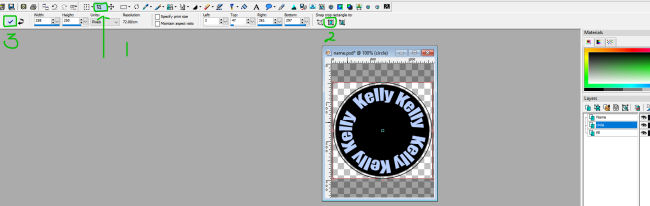
1. Open circle with you name on it. Now you can change the colour of you name if you like.
2. Highlight name layer. There are two ways of doing this. You can select all, float, defloat, add a new layer and fill with colour of choice, then delete the original name layer. Or use the manual colour correction tool. Highlight name layer, open manual colour correction icon, select manual target colour, which is on the lower left side, then click on the top colour square and add the colour of the original name... then select the lower colour square and change it to the colour you wish your text to be. Ok.
3. Delete white bg layer. Highlight circle layer, press the letter r on your keyboard, or click on the crop tool, now click on layer opaque.
Resize, all layers checked, to 70%.
4. Highlight name layer and copy and paste as new layer into AS.
5. Click on Effects, Insert Image Effect. Effect - Rotate with these settings:

6. Click on the first frame and delete, Whilst still on first frame, Edit, select all. In toolbar, click propagate paste button.
7. Back in PSP. Close out name layer. Copy merged, back into AS and paste as a new layer.
8. On this new image. Click on duplicate layer icon in your toolbar, until you have 10 frames, Click back on first frame, edit select all.
9. Highlight name image that you added the rotate to. Make sure you have all frames selected. Click and hold on the first layer, and drag it down to your new image with the circle layer. With out letting go, place this name layer as close to the center of the circle as you can. Run the animation and see if you are happy with it... if not try again.
10. When you are happy with it, click Animation in toolbar and choose reverse frames. In the same place click on Frame properties and change the setting to around 15.
11. Go back into PSP. Click on your tag, copy merged and paste as new image in AS. Again, click on duplicate layer icon in your toolbar until you have 10 frames, click back on the first frame and Edit, select all.
12. Grab your rotating name image. Make sure all layers are highlighted. Click on Animation, drag it down to your tag and place it where you like into the right frame.
13. Run animation.
If you like what you see, save as.
Thank you for playing with my tut... I hope you enjoy your result and remember, my tut is just a guide, use your imagination.

If you have any questions please email me - willowhoop@gmail.com

Subscribe to:
Post Comments
(Atom)
0 comments:
Post a Comment